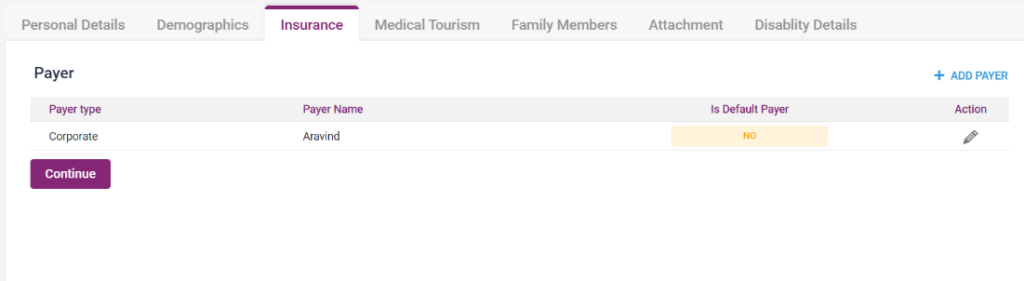
In this tab, the user must enter the customer’s insurance details.
- Click on the “+ Add Payer” button in the top right corner.
- On clicking a page to enter, the payer details will be displayed.
- Select the “Payer Type*” from the drop-down list found in the field.
- There are three types of payers types found. According to the type of payer selected, the page will display the details which must be entered.
- The following are the types of payers found,
I) Insurance
II) Corporate
III) Sponsorship
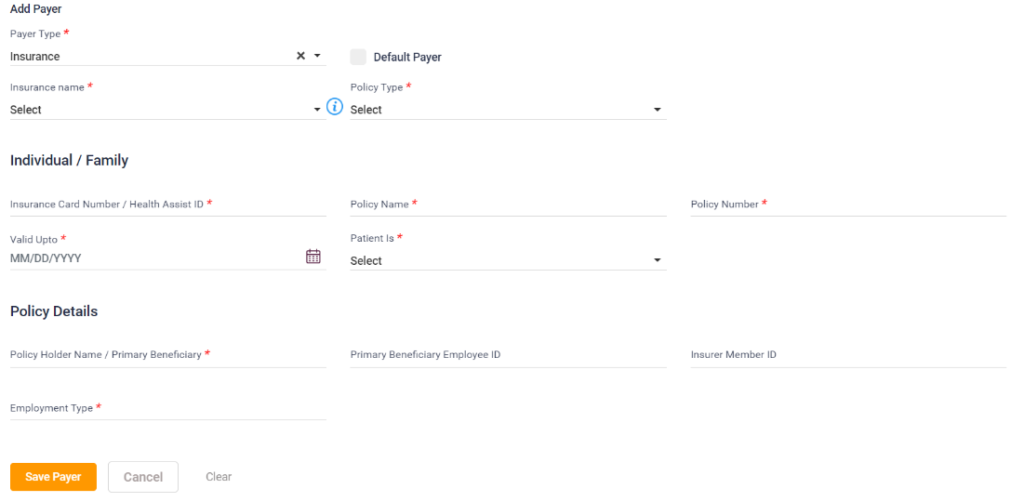
- Insurance:
Upon selecting “Insurance,” the fields to be filled will be displayed. Description of those fields are given below,
- Default Payer –Check box: Select this check box if the patient wants this particular payer to be the default payer for all the transactions this patient will do.
- Insurance Name *: Select the Name of the Insurance added, which will be shown in the drop-down box.
- Info icon: Upon clicking this icon, the details of this particular Insurance will be displayed in a pop-up box.
- Policy Type *: Select the policy type from the drop-down list displayed.
- Individual/Family – Insurance card number/Health Assist ID *: Enter the patient’s insurance card number or health assist ID.
- Policy Name *: Name of the policy to be entered.
- Policy Number *: Enter the policy number.
- Valid Upto *: Enter the policy end date.
- Patient Is *: Select the patient, whether the payer is themself or a family member.
- Policy Details- Policy Holder Name/Primary Beneficiary *: Enter the Name of the Policy Holder
- Primary Beneficiary Employee ID: Enter the Beneficiary’s employee ID.
- Insurer Member ID: Enter the Insurer Member ID.
- Employment Type *: Enter the employment type.
- Save Payer button: After entering the details as mentioned above, Click on the Save button to save the details. After the details are saved, the payer’s name will be displayed in the list under the Insurance tab.
- Cancel: Upon clicking cancel, and it redirects to the Insurance page.
- Clear: Upon Clicking resetting the page, the details entered will be deleted.
- Corporate:
After selecting “Insurance, ” the fields to be filled will be displayed. Description of those fields are given below,
- Default Payer –Check box: Select this check box if the patient wants this particular payer to be the default payer for all the transactions this patient will do.
- Name of Company/ Organization *: Select the Name of the Company/Organization added, which will be shown in the drop-down box.
- Info icon: Upon clicking this icon, the details of this particular Company/Organization will be displayed in a pop-up box.
- Individual/Family – Patient Is *: Select the patient, whether the employer is themself or a family member.
- Employee Name *: Enter the Name of the employee whose insurance details are given.
- Employee ID *: Enter the employee ID.
- Employee Designation *: Enter the designation of the employee.
- Employee Department *: Enter the department of the employee.
- Save Payer button: After entering the details as mentioned above, Click on the Save button to save the details. After the details are saved, the payer’s name will be displayed in the list under the Insurance tab.
- Cancel: Upon clicking cancel, and it redirects to the Insurance page.
- Clear: Upon Clicking resetting the page, the details entered will be deleted.
- Sponsorship:
After selecting “Sponsorship, ” the fields to be filled will be displayed. Description of those fields are given below,
- Default Payer –Check box: Select this check box if the patient wants this particular payer to be the default payer for all the transactions this patient will do.
- Sponsor Name *: Select the Name of the Sponsor added, which will be shown in the drop-down box.
- Info icon: Upon clicking this icon, the details of this particular Company/Organization will be displayed in a pop-up box.
- Additional Information/Notes: Any additional notes about the sponsorship must be filled in here if required.
- Save Payer button: After entering the details as mentioned above, Click on the Save button to save the details. After the details are saved, the payer’s name will be displayed in the list under the Insurance tab.
- Cancel: Upon clicking cancel, and it redirects to the Insurance page.
- Clear: Upon Clicking resetting the page, the details entered will be deleted.
After entering and saving any of the abovementioned details, it will be displayed in the list under the “Insurance” screen.
3.4. Insurance – Payer Type-Insurance:
3.5. Insurance -Payer type- Corporate:

3.6. Insurance –Payer type- Sponsorship:

3.7. Insurance Screen: