An obstetrics EHR consists of all the sections of a General EHR. And also, a few more sections have been added. They are,
In the Health Dashboard,
Along with the other sections of a General EHR, the obstetrics section is included.
Obstetrics-
- The patient Obstetrics page will be loaded by clicking the edit icon next to the Obstetrics EHR.
- Obstetrics – Enter the First consultation date, UPT positive date, pre-pregnancy weight, and LMP date. After entering LMP, the EDD will be calculated and displayed. Enter the PICME number, Initial ultrasound date, fetus count, and corrected EDD. Enter the GPLA details, select the obstetric information, and enter the details below. Added elements can be edited and click the “Update” button.
- High Risk – Select the increased risk, select the identified date, and click the “Add High risk” button. The added details can be edited or deleted using the edit and delete icons.
- Classes – Select the training type, class date, trainer, and notes, if any, and click the “Save” button. The added details can be edited or deleted using the edit and delete icons.
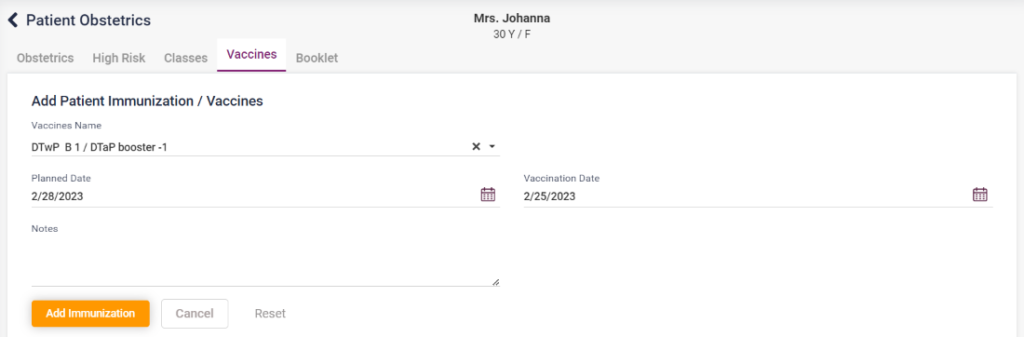
- Vaccines – Select the vaccine, plan date, vaccine date, and notes, if any, and click the “Add Immunization” button. The added details can be edited or deleted using the edit and delete icons.
- Booklet – Select the booklet name, issued by, and given date, and click the “Add Booklet” button. The added details can be edited or deleted using the edit and delete icons.
1. Obstetrics- Dashboard

2. Obstetrics- Obstetrics


3. Obstetrics- High Risk

4. Obstetrics- Classes
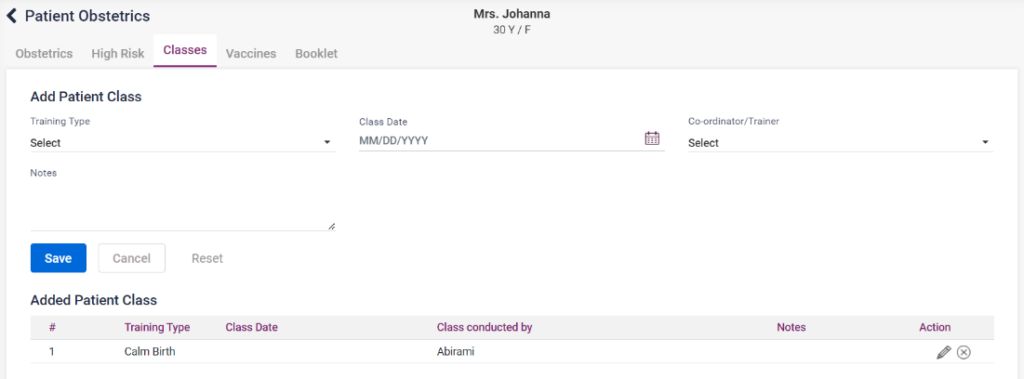
5. Obstetrics- Classes
6. Obstetrics- Booklet

- Medication- Details of the medicines taken by the patient with medicine count and several days.
- Visit- Visit the history of the patient. On clicking print, the summary can be printed. On clicking edit we can edit the details entered.
- Medical History- Click on the edit icon next to the Medical History heading. The medical history page consists of the following tabs,
- Allergies – Select the allergy, enter the number of days, select the severity, enter the onset and notes if any, check the Is active checkbox click on the Add Energy button. The entered details can be edited or deleted using the edit and delete icons.
- Social Habits – Select the social habits, enter the number of days and notes if any and click on the “Add Social Habit” button. The entered details can be edited or deleted using the edit and delete icons.
- Medical History – Select the medical history type, medical history, enter the number of days, start date, end date and notes then click on the “Add Medical History” icon. The entered details can be edited or deleted using the edit and delete icons.
- Family Medical History – Select the medical history, relationship, enter the number of dates and notes if any and click on the “Add Medical History” icon. The entered details can be edited or deleted using the edit and delete icons.
- Current Medication – Select the medication, select the start date, end date and click on the “Add Current Medication” button.
- Click on the “View Summary” icon on the right corner to view the entered medical history details in a summary.
- Diagnosis- Any diagnosis added in the case sheet for the patient will be displayed here.
- Advice- Advice provided for the patient by the physician in the case sheet will be displayed here.
- History Button- On clicking the history present in the right corner of the page, the visit history of the patient will be displayed.
- Case Sheet:
A Case Report is a detailed report of a patient’s symptoms, signs, diagnosis, treatment, and follow-up.
It is a formal communication between health care professionals, such as doctors and nurses, regarding a patient’s clinical information.
Open a new case sheet by clicking on the doctor’s name under the case sheet tab. The user can open the old case sheets of the patient also.
New Case Sheet:
There are few icons present in this sheet,
- Patient Appointment icon – It directs to the patient appointment page of the particular physician.
- Doctor Dashboard icon – It navigates to the doctor’s dashboard.
- Doctor Schedule icon – It directs to the doctor schedule page.
- View Summary icon – The summary of the case sheet will be displayed.
- Print icon – The print page of the case sheet will be displayed.
- Settings icon – The list of tabs which are needed in the case sheet can be selected in the displayed pop up box. The new case sheet contains the following details to be entered by the user,
1. Vitals- The vitals section includes, Temperature, BP (systolic and diastolic), pulse, Respiration rate, heart rate, blood sugar (pre, post and random), SPO2, Weight and height. After entering these data, the user can click “Save” button.
Mother Vitals- This section will be enabled only if it is an “Obstetrics case sheet.”
The vitals include “P/A,” “TVS,” “P/V,” “Urine,” and “Liquor Volume .”Enter the details and click on the save button.
Fetus Vitals- This section will be enabled only if it is an “Obstetrics case sheet.”
The vitals include “Fetus vital,” “Height,” “Weight,” “Heart Rate,” “Presentations,” “Station,” “Movements,” and “Ocdema .”Enter the details and click on the “Add Fetus Vital” button.
1.3- EHR Case Sheet- Vitals, Mother and Fetus Vitals

2.Chief Complaints- In this section, select the chief complaint of the patient from the drop down list and select the period. Enter the present history and notes if needed. Click on the “Add” button on the right, the chief complaint entered will be saved and displayed on the top. Click on the added chief complaint to edit or delete it.
Screenshot:
1.4. – EHR Case Sheet- Chief Complaints

3.Examination- The user can select the examination from the drop down list. Enter the period, severity and notes if needed. Click on the “Add” button to display the examination added. Click on the added examination to edit or delete it.
Screenshot:
1.5. – EHR Case Sheet- Examination

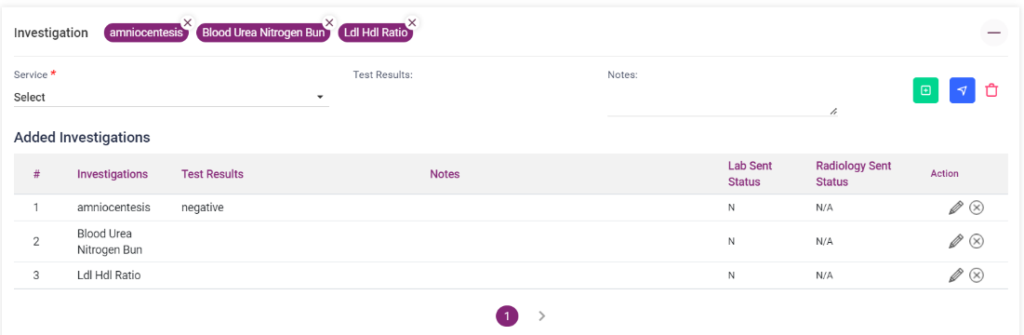
4.Investigation- In this section, select the investigation from the service drop down box. Enter the test results and notes if needed. Click on the “Add” button to display the investigation added. Click on the added investigation to edit or delete it.
Screenshot:
1.6. – EHR Case Sheet- Investigation
5.Diagnosis- The user can select the diagnosis from the diagnosis name drop down list, select high risk check box if the diagnosis is critical. Enter the treatment given in the field if needed. Click on the “Add” button to display the diagnosis added. Click on the added diagnosis to edit or delete it.
Screenshot:
1.7. EHR Case Sheet- Diagnosis

6.Prescription-
- Favorite Medicine: On clicking the drop down list, shows the added favorite medicines.
- Medicine Name: Select the medicine name from the drop down list.
- Category and generic name: This field gets automatically loaded from the medicine.
- Dosage level: Select the dosage level from the drop down list.
- Unit: Select the unit from the drop down list.
- Tablet Routine: Select the tablet routine “Mor”,”Noon”,”Eve”,”Night” according to the doctor’s prescription.
- Advanced Settings: Click on advanced settings to select the tablet routine on hour basis.
- When to take: Select “B/F”, “A/F”, “Empty Stomach”, “Bed Time” according to the doctor’s prescription.
- Frequency: Select the prescribed frequency.
- Advice: Enter any advice if needed or select any one from the field.
- Quantity: Quantity gets automatically calculated and is displayed.
- Rate and Amount: It gets automatically calculated and is displayed.
- Disc Type: Select the type of discount and enter the amount or percentage accordingly.
- Net Amt: It gets calculated automatically.
- Add more Notes: On clicking Add more notes, notes field gets displayed. The user can enter notes if needed. This can be removed by clicking the “Remove more notes”.
- Add Medicine: Click on “Add Medicine” button to add the medicine in the prescription list.
- Add This Prescription Saved List: Click on this button to save this particular prescription.
- Reset: Select Reset button to delete the entered settings.
Screenshot:
1.8. – EHR Case Sheet- Prescription(Add prescription)

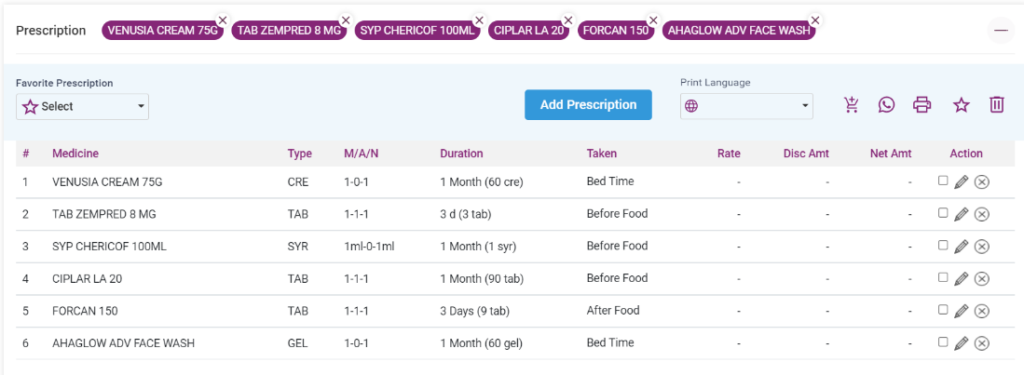
The added medicines will be displayed in the “Added Prescription” list. The added prescription list provides the following options:
- Send to pharmacy icon: On clicking this icon the added medicines are sent to the “Sales Dashboard” under Pharmacy module.
- Whatsapp icon: On clicking the whatsapp icon, the prescription can be sent to the patient’s whatsapp number as a whatsapp message.
- Print icon: On clicking the print of the added medicines will be shown.
- Translate icon: On clicking, the entered “notes” and “when to take” field will be translated to the selected language from the drop down list in the “Print language” field.
- Star icon: On clicking this icon the added medicines will be added to the favorite medicine list.
- Delete icon: On clicking the delete icon , all the medicines in the list will be deleted.
- Edit icon: Edit icon can be used to edit the medicines individually.
After this discount can be given for the overall amount by selecting the discount type and entering the amount accordingly. The final amount will be calculated and displayed in the “Total Net Amount” field.
1.9. – EHR Case Sheet- Prescription (Added Medicine list)
7.Therapy- The user can select the therapy from the drop down list, enter the improvement marks and add notes if any. Current date and time will be automatically displayed in the “Date” field. Click on the “Add Therapy” button to display the therapy added in the list below. Click on the “Reset” button to edit delete the entered details.
Screenshot:
1.10. – EHR Case Sheet- Therapy

8.Instructions- Select the instruction from the drop down list and enter notes if any. Click on the “Add” button to display the Instructions added. Click on the added instructions to edit or delete it.
Screenshot:
1.11. – EHR Case Sheet- Instructions

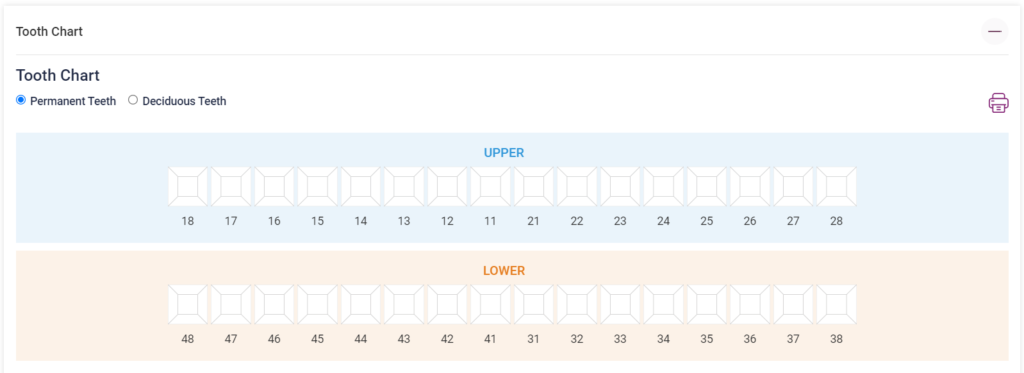
9.Tooth Chart- This section is generally present in a Dental EHR but this can be added from the settings icon below the case sheet in any type of EHR.
- Tooth chart: The number of Permanent teeth and deciduous teeth will be displayed as an image. The user can click on each tooth and enter the details of the tooth position, add color to the decayed part of the teeth according to the severity.
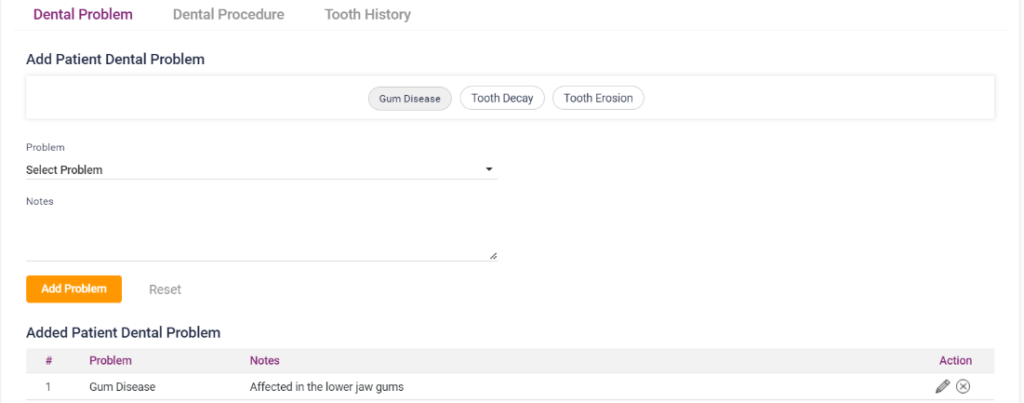
- Dental Problem: Select the dental problem from the drop down list, enter notes if any. Select the “Add Problem” button to display the added dental problem in a list below. Click on the Reset button to delete the entered details. The user can edit or delete the added problems by using the “Edit” and “Delete” icons present.
- Dental Procedure: Select the procedure from the drop down list, enter notes if any. Estimated amount will be displayed automatically. Select the “Add Procedure” button to display the added dental procedure in a list below. Click on the Reset button to delete the entered details. The user can edit or delete the added procedures by using the “Edit” and “Delete” icons present.
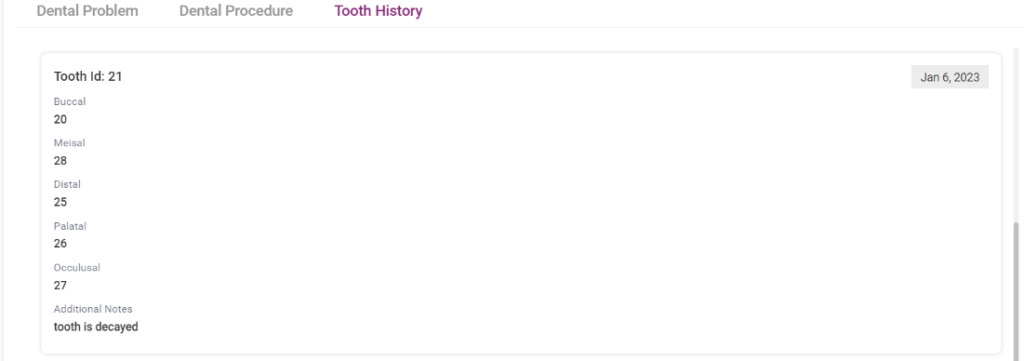
- Tooth History: This section displays the tooth details of the patient entered.
Screenshot:
1.12. – EHR- Case Sheet- Tooth Chart
1.13. – EHR- Case Sheet-Tooth Chart- Dental Problem
1.14. – EHR- Case Sheet-Tooth Chart- Dental Procedure

1.15. – EHR- Case Sheet-Tooth Chart- Tooth History
10.Vaccine Chart- This section is generally present in a Pediatric EHR but this can be added from the settings icon below the case sheet in any type of EHR.
This can be loaded if the patient is a pediatric. On opening Vaccine chart tab, it asks to “Confirm”. Once the user clicks the “Confirm” button, the vaccine chart for a child from birth till age 12 will be loaded.
Screenshot:
1.16. – EHR- Case Sheet- Vaccine Chart

11.Visit Summary- On opening the visit summary tab, the visit history details of the patient will be loaded automatically.
Screenshot:
1.17. – EHR Case Sheet- Visit Summary

12.Treatment Plan- Select the treatment plan of the patient from the drop down list, select the next visit date, add notes if any. Click on the “Add” button on the right, the treatment plan entered will be saved and displayed on the top. Click on the added chief complaint to edit or delete it.
Screenshot:
1.18. – EHR Case Sheet- Treatment Plan

13.Brand List- The user can add the available Combo Vaccine from the medicine list. The added vaccines will be displayed in a list below. It can be edited using the edit option.
Screenshot:
1.19. – EHR Case Sheet- Brand list

14.Nurse Notes- Select the “Nurse name”, “Shift Name”, “Date”, enter notes if any and enter the “Pain level”. Click on the “Add Nurse Notes” button, the added nurse note will be saved and displayed in a list below. Click on the “Reset” button to delete the entered details. The added notes can be edited or deleted individually using the icons present.
Screenshot:
1.20. -EHR Case Sheet- Nurse Notes

- Treatment Plan:
The user can add treatment plan for the patient according to the physician’s advice.
- Treatment Plan: Select a treatment plan from the drop down list.
- Planned Start Date: Select a start date for the treatment plan.
- Actual Start Date: Select the actual start date of the treatment plan.
- Actual End Date: Select the actual end date of the treatment plan.
- Physician: Select the physician who suggested the treatment plan.
- Treatment Status: Select the status of the treatment plan.
- Notes: Enter notes if any.
- Add Treatment Plan: Select the “Add Treatment Plan” button to display the added treatment plan in a list below.
- Reset: On clicking the reset button entered details can be deleted.
- The added treatment plan can be edited individually by using the edit icon in the list.
Screenshot:
1.21. EHR- Treatment Plan

- Lab Reports:
This section contains the lab reports of the patient which was taken and completed. The user can View, Share and Download the lab reports of the patient.
Screenshot:
1.22. – EHR- Lab Reports

- Radiology:
This section contains the radiology reports of the patient. The user can,
- Edit the Physician name and notes of the report
- Compare two reports at the same time
- Download, Print, Delete and View the report
- Can search the reports according to the date and name
Screenshot:
1.23. – EHR- Radiology


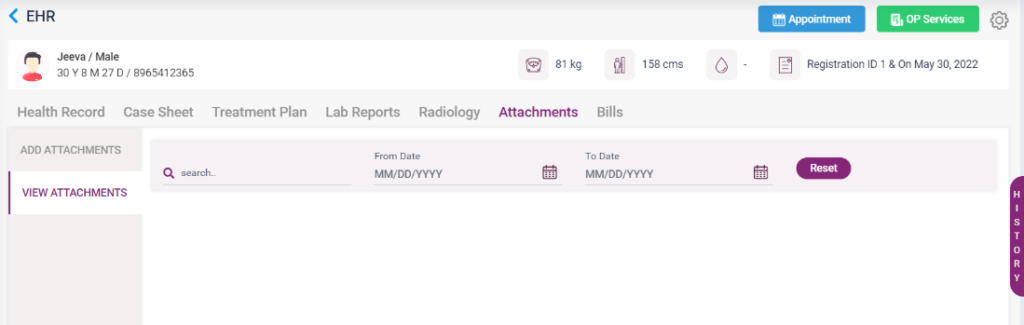
- Attachments:
In this section the user can attach any file which belongs to the patient. It may include lab, radiology, general consultation, prescription or any type of file.
Add attachments- The user must select the category, enter the name(who uploaded) and notes if any and click on the “Save” button after choosing the file from the local PC by using the “Choose File” button. “Clear” button can be used to delete the entered details.
Screenshot:
1.24. – EHR- Attachments- Add attachment

View attachments- The user will be able to view the uploaded attachments in this section. Also the files can be searched by date and name.
1.25. – EHR- Attachment- View attachment
- Bills:
This section of the EHR contains all the bills paid by the patient. The bills can be searched by date, name and status. After search the bills will be displayed as a list in the page. The user can edit, print and share the bills of the patient.
Screenshot:
1.26. – EHR- Bills
