Sales of Pharmaceutical products, which may include medicines, surgical devices, consumables of any form, machines, and equipment used in surgeries is called Pharmacy Sales. The target audience is doctors of any kind, chemists, and purchase in-charge in hospitals or pharmacies. The pharmacy sales section includes,
A. Sales
B. Sales Return
C. Sales Dashboard
A. Sales: The pharmacy sales include the sales of the doctor’s prescribed medicines, the equipment or things needed for an operation or any other sales. The pharmacy sales list can be searched using the “From date”, “To date” and “Period”. New sales can be added using the “Counter sales” button and do the following steps,
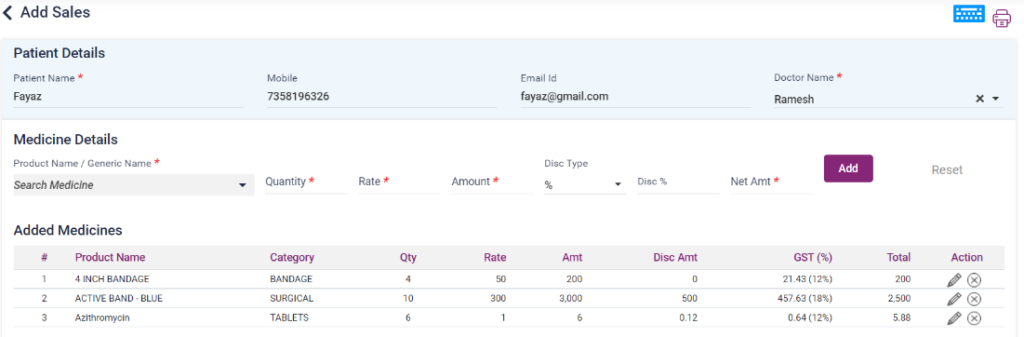
- Patient Name * : In the patient details section enter the Patient name.
- Mobile Number * : Enter the Mobile Number of the patient.
- Doctor Name * : Select the doctor name the patient has consulted.
- Product Name: Select the medicine/ product name from the list.
- Quantity: Enter the quantity of the medicine to be sold. The available quantity will be shown below the field.
- Rate: The medicine rate will be populated after selecting the medicine.
- Amount: The Amount of the medicine will be calculated once the quantity is entered.
- Discount: Discount for the particular medicine can be given by selecting the discount type and entering the Percent /amount accordingly.
- Net Amount: The net Amount will be calculated after entering the mandatory fields.
- Add button: On clicking the add button, the medicine with the given details will be added to the list below.
- Reset: On clicking the reset button, the entered details will be deleted.
- After the medicines are added in the list, the added medicines can be edited and deleted using the available icons.
- The count and the Total Amount will be shown below.
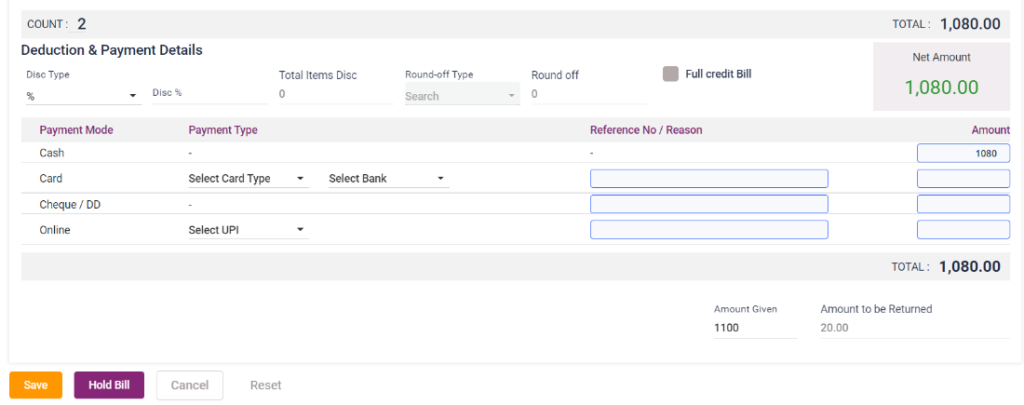
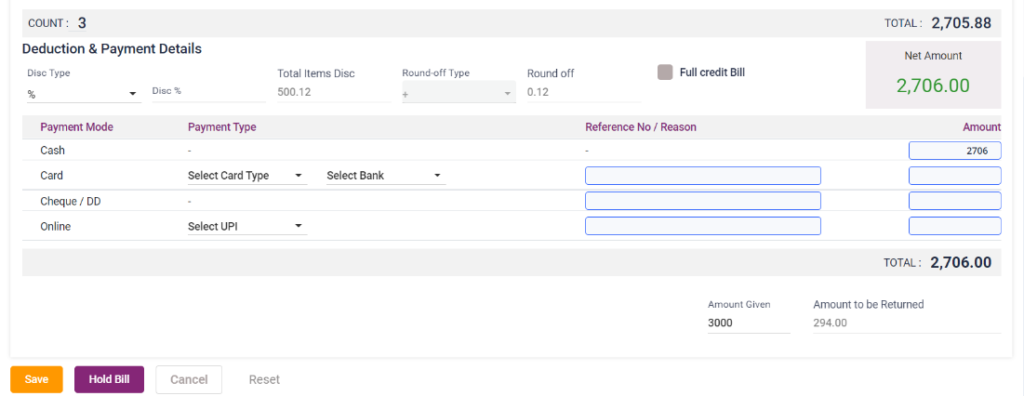
- Under the deduction and payment details, the total discount for the final Amount can be given. Select the discount type and enter the discount per cent/ amount accordingly. The total Amount will be calculated and displayed.
- Full credit bill check box: If the payer wants to pay the bill through credit, then this option has to be checked. After selecting this, the particular bill will be moved to the “Credit Bill” page in the “Accounts” section.
- The payment of bill can be paid by using the following payment modes, Cash, Card, Cheque or Online. Select the mode of payment, enter the reference number and Amount. Payment can be done using multiple methods also.
- Amount given and Amount to be returned: Enter the Amount given by the payer, the “Amount to be returned” will be calculated and displayed in the field.
- Save: Click on the save button to pay the bill and the bill will be displayed in the “Pharmacy sales” page.
- Hold bill: Click on the hold bill button to pay the bill later or the payer couldn’t pay due to some other reasons. On clicking the hold bill option, the particular bill will be moved to the “Unbilled list” in the Sales dashboard.
- Cancel and Reset: Click on the Cancel button to cancel the bill sales. Click on the Reset button to clear the details entered details.
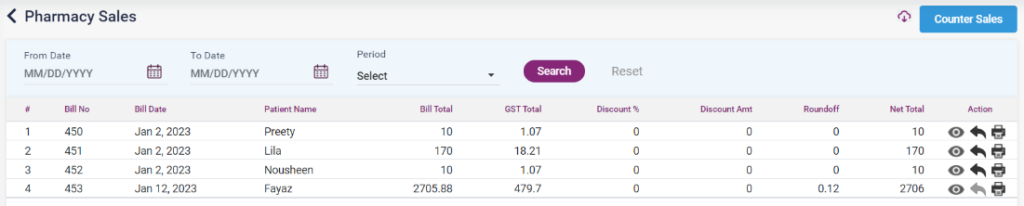
- View: In the pharmacy sales page, click on the View icon to view the sales bill.
- Print: Click on the print icon to print the sales bill.
- Sales Return: Click on the Sales return icon to return the items which has been sold.
11.20. Pharmacy sales- Add sales- add medicine section
11.21. Pharmacy sales- Add sales- Payment section
11.22. Pharmacy- Pharmacy sales page
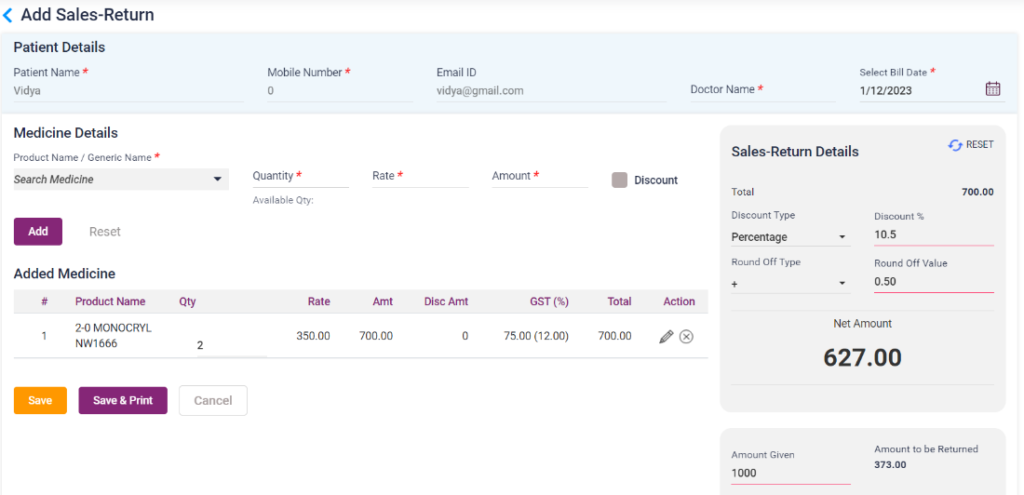
B. Sales Return: The pharmacy sales return page has the details of the items which the buyer has returned because of various reasons which include damaged medicines, expired medicines or any other reasons. In the Sales page, click on the sales return icon which leads to the “Add Sales Return” page. On clicking the sale return page, the “Patient details” section will be automatically loaded. The user must enter the following details,
- Product Name: Select the medicine which has to be returned from the list.
- Quantity: Enter the quantity which has to be returned.
- Rate and Amount: rate and Amount will be calculated and displayed automatically.
- Discount: Discount can be given by selecting the discount type and entering the percent/amount accordingly.
- Total Amount with discount: the Amount with discount will be calculated and displayed.
- Add: Click on the add button to add the medicines to be returned in a list below.
- In the sales return details, check the discount check box to give a discount on the total Amount. Click on the Round off check box to round off the Amount to be paid.
- The added medicines can be edited and deleted by using the available icons.
- Amount given and Amount to be entered: Enter the Amount given by the payer, the “Amount to be returned” will be calculated and displayed in the field.
- Save: Click on the save button to save the sales return bill.
- Save and Print: Click on this button to save the bill and get a print of the bill.
- Cancel: Click on the cancel button to cancel the sales return and go back to the previous page.
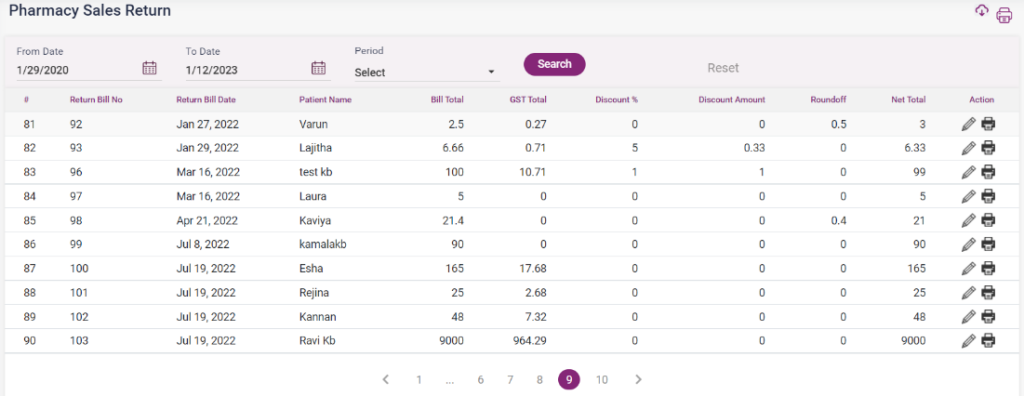
- The bills will be listed in the “Pharmacy sales return” page and can be searched using the given search criteria.
11.23 Pharmacy sales return – Add sales return- add medicine
11.24. Pharmacy- Pharmacy sales return page
C. Sales Dashboard: The sales dashboard of Ezovion HMS consists of the revenue earned through sales, purchase and return. It has the pending bills from the EHR-Case sheet-Prescription section of the patient. And also the bills which are “Completed”, “Unbilled” and “Archived”.
- The dashboard section consists of the following details,
- Amount of Cash through Sales (No. of bills)
- Amount of cash returned
- Amount of cash through receipt
- Amount of cash through purchase
- Amount of cash through purchase return
- Amount of payments done
- These pending bills section contains the bills which the physician prescribes in the EHR-Case sheet- Prescription section and is not paid.
- The Number of bills will be displayed here. These bills can be archived or added as a new bill list.
- The pending bills can be searched using the search text box and the Period drop down list.
- A new Sales can be added using the “+ Counter Sales” button which leads to the “Pharmacy Sales” page.
- On clicking the “New bill” option of the pending bill, it leads to the “Add Sales” page with the prescribed medicines in a pop up box. It shows the prescribed quantity, taken quantity and the total stock of the medicines in the prescribed list.
- After closing the pop-up box, only the available medicines will be added to the “Added Medicines” list.
- The added medicines can be edited or deleted using the icons available. The user can add more medicines from the list if the customer has bought any extra medicines.
- Then a discount can be given in the discount section and followed by payment by the various available options.
- On clicking the save button the particular bill will be paid and listed in the “Pharmacy Sales” page. On clicking hold bill button the particular bill would be moved to the “Unbilled List” section of the Pharmacy Sales Dashboard.
Screenshot:
11.25. Pharmacy- Sales dashboard

11.26. Pharmacy- Sales dashboard-Pending bills- New bill- Prescription list

11.27. Pharmacy- Sales dashboard-Pending bills- New bill- Add sales
11.28. Pharmacy- Sales dashboard-Pending bills- New bill- Add sales- Payment section