Pharmacy purchase is a process of acquiring supplies through purchases from manufacturers. Their agents like distributors or private or public suppliers. Purchasing medicines starts with framing buying policies and ends with receiving, stocking, and payment. The pharmacy purchase section includes,
a. Purchase- Pharmacy->Purchase->Purchase
b. Purchase Return-Pharmacy-> Purchase->Purchase Return
c. Purchase Order- Pharmacy-> Purchase->Purchase Order
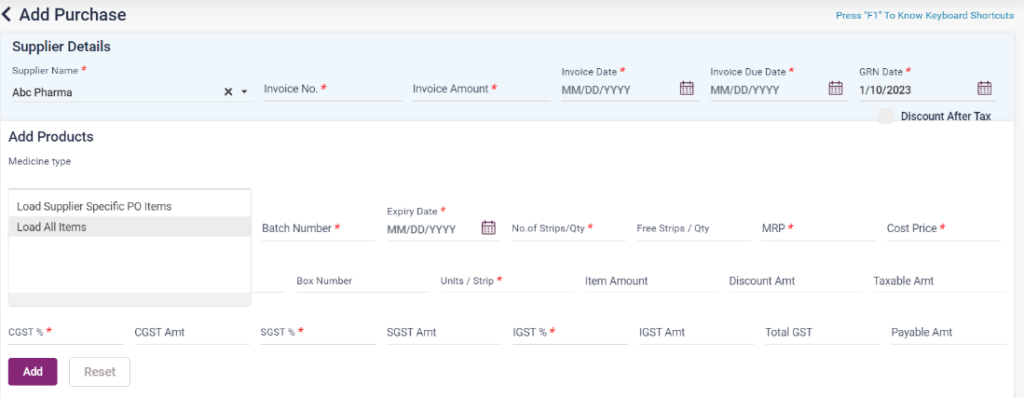
a. Purchase: The necessary medicines needed for the Hospital can be purchased in this section. The purchased list can be searched using the From date, To date or Period. The pending purchases will have an edit icon to approve the purchase, and the approved purchase will have a view icon to view the purchase. Click the “Add Purchase” button on the “Add Purchase” screen. Enter the following details using the Invoice available from the purchase.
- Supplier Name * : Select the Supplier name from the drop-down list.
- Invoice Number * : Enter the invoice number.
- Invoice Amount *: Enter the invoice amount.
- Invoice Date *: Select the Invoice date from the calendar.
- Invoice due date * : Select the invoice’s due date from the calendar.
- GRN Date *: Select the GRN Date from the calendar.
- Discount after Tax: Select this check box to show the taxable Amount as a discount after the tax.
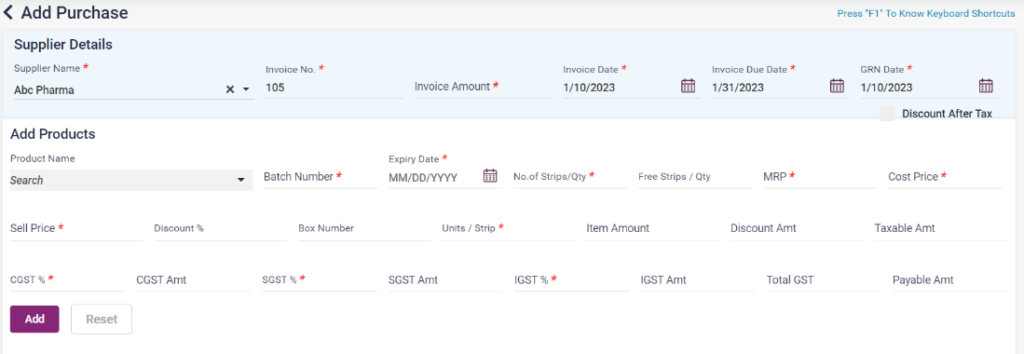
- Product Name * : Select the medicine name from the Product list.
- Batch No * : Enter the batch number of the medicine.
- Expiry Date * : Select the expiry date of the medicine.
- No of Strips * : Enter the Number of strips you wanted to purchase.
- Free Strips/Qty: Enter if any free quantity is received.
- MRP * : Enter the actual price of the medicine.
- Cost Price: Enter the cost price of the medicine at which it was purchased. When entering the cost price, the “Item Amount” and “Taxable Amount” will be automatically calculated and displayed.
- Sell Price: Enter the price of the medicine it has to sell in the hospital pharmacy.
- Discount: Enter the percentage of discount on the purchased medicine. The discount amount and taxable Amount will be automatically calculated and displayed when entering the discount percentage.
- Unit/Strip, Item Amount, Discount Amount, Taxable Amount, CGST, CGST Amount, SGST, SGST Amount, IGST, and IGST Amount will be displayed based on the given medicine details in Medicine master.
- The fields mentioned above, Total GST and Payable Amount will be calculated according to the discount amount and cost price.
- After entering all the mandatory fields, click the “Add” button to add the medicine to the list. The added medicines will be displayed in the list below. Click on the Reset button to delete the entered details of the medicine.
- Click on the “Save” button to save the purchase. This will be listed on the Pharmacy Purchase page screen. GRN Status will be displayed as “Pending” if the Invoice amount and net Amount are not the same.
- If the net Amount and Invoice amount match, on clicking save, the purchase approval pop-up box appears. The user must click the “Approve” button to approve the purchase and list it in the Pharmacy Purchase screen. GRN Status will be displayed as “Approved”.
- The purchased items will be updated in the “Stock List”.
Screenshot:
11.9. Pharmacy purchase- Add purchase
11.10. Pharmacy purchase- Add Purchase- Added products

11.11. Pharmacy purchase list screen

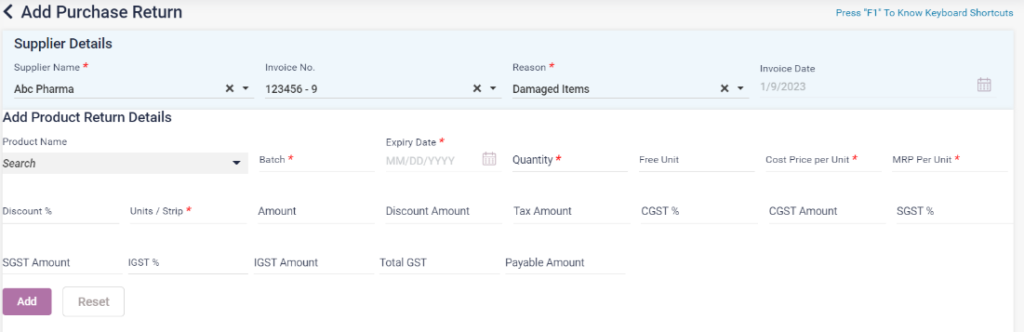
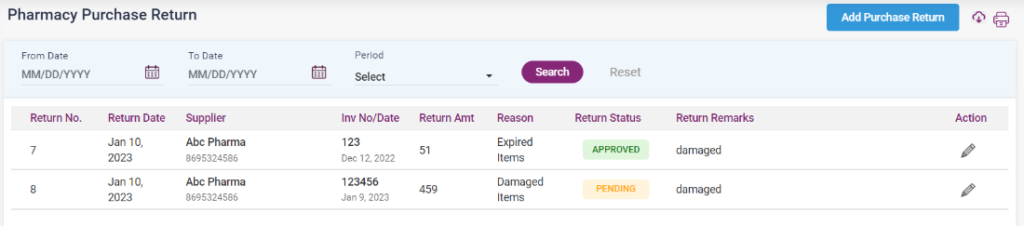
b. Purchase Return: If the products purchased are damaged, expired, ordered by mistake or for any other reason, those particular products can be returned to the distributor. The purchased list can be searched using the From date, To date or Period. Using the following steps,
- Pharmacy->Purchase-> Purchase Return-> Add Purchase Return button
- Supplier Name * : The user must select the supplier’s name from the Invoice which must be returned.
- Invoice No: Select the invoice number to be returned.
- Reason * : Select the reason of return from the field.
- Invoice Date: The date of the Invoice will be automatically loaded.
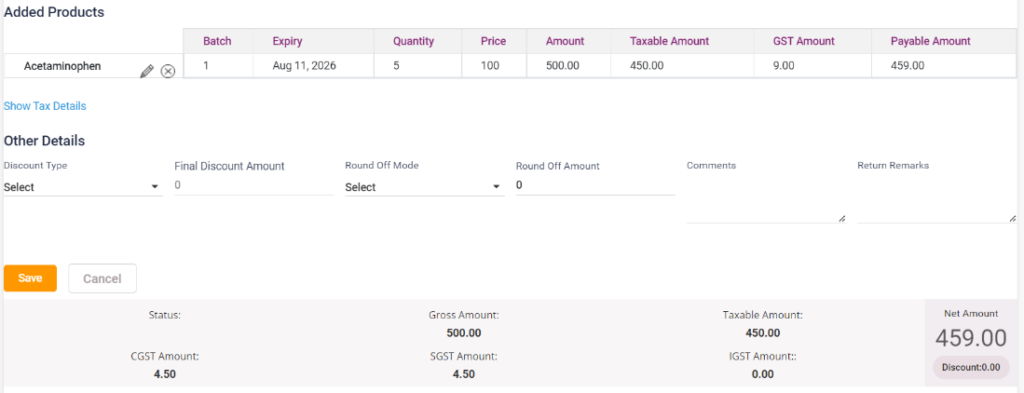
- Product Name: Select the name of the product from the list. Once the product is selected, the other fields will be automatically loaded as given in the purchase. The user must enter only the quantity that must be returned in the Quantity and Free Unit fields accordingly.
- Add : Click the add button to add the medicine to the list below.
- Cancel: Click on the Cancel button to cancel the return and go back to the previous page.
- Other details: Discount can be given to the returned products in this section.
- Return Remarks * : Remarks for return have to be entered.
- Save: Click on the save button to save the purchase return details, which will be listed on the “Purchase Return” page with the return status as “Pending”.
- After completing the return process, the user must click on the edit icon of the purchase return entry and click on the “Update” button for the “Purchase Return Approval” pop-up box.
- Click on the “Approve” button to approve the purchase return. After this, the entry will be listed on the “Purchase Return” page with the return status as “Approved”.
Screenshot:
11.12. Pharmacy Purchase Return- Add Purchase Return page
11.13. Pharmacy Purchase Return- Add Purchase Return-Added products
11.14. Pharmacy Purchase Return (list screen)
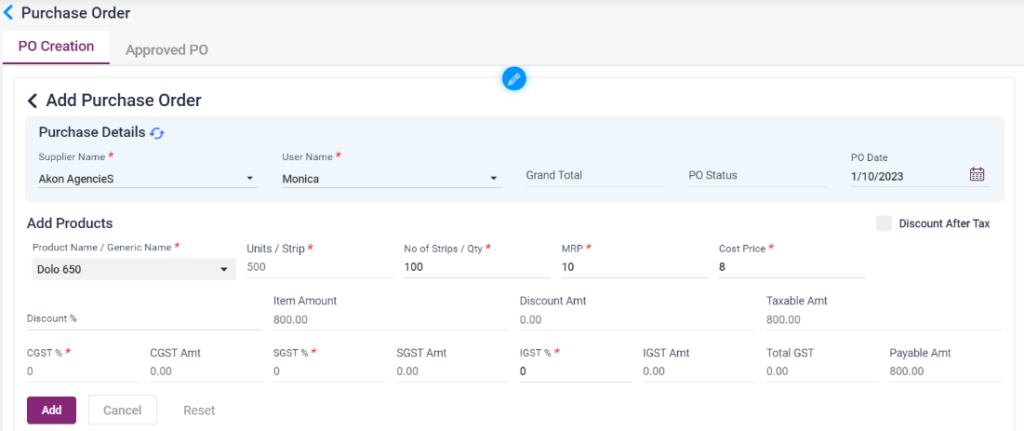
c. Purchase Order: A purchase order is a document, executed by a purchaser and forwarded to a supplier, that is considered a legal offer to buy products or services. It demonstrates their commitment to pay for specific products and services from a seller and establishes terms for payment. A PO communicates the buyer’s needs to the seller and establishes their expectations. In Ezovion HMS, it has two steps,
I) PO Creation
II) PO Approval
I) PO Creation:
- The created purchase orders can be searched using the From date, To date and Period.
- To create a purchase order, click “Add Purchase Order” which directs you to the “Add Purchase Order” screen. On that page, enter the following details.
- Supplier Name * : Select the supplier name from the list.
- User Name * : Select the user name creating the purchase order.
- Product Name/Generic Name * : Select the medicine to add to the Purchase Order. After selecting the Units/Strip gets automatically loaded.
- No of Strips/Qty * : Enter the quantity of the medicine needed.
- MRP * : Enter the MRP of the medicine.
- Cost Price * : Enter the cost price at which the medicine has to be purchased.
- Discount % : Enter any discount if available. Once entered, the Item amount, discount amount and taxable Amount are calculated and displayed.
- The CCGST, CGST Amt, SGST, SGST Amt, IGST, IGST Amt, and Total GSST will be loaded from the medicine’s details. The total payable Amount will be displayed.
- Add: Click on Add button to add it to the list below.
- Cancel: Click the Cancel button to cancel the purchase order and return to the previous page.
- Reset: Click on the reset button to clear the details entered.
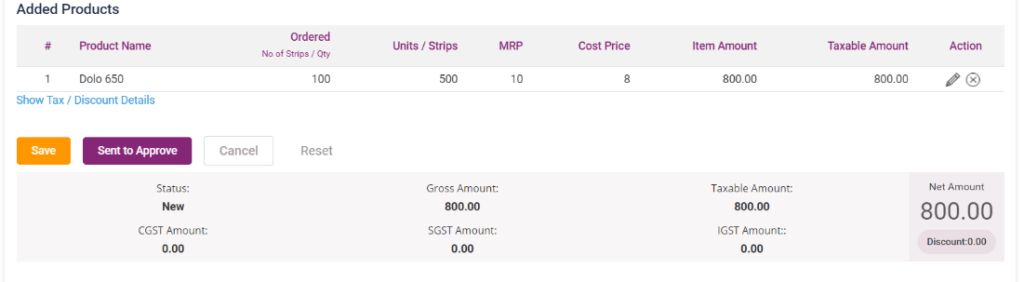
- Edit icon: Click on the edit icon in the added list to edit the details of the added medicine.
- Delete icon: Delete icon is used to delete the added products.
- Save button: Click on the save button to save the purchase order, and it will be displayed on the Purchase Order page as a list, and the PO Status will be “New”.
- Send to Approve: Click on the “Send to Approve” button to save the purchase order and send it for approval. The PO Status of the purchase order will be set as “Waiting”.
- Cancel and Reset button: Click the cancel button to cancel the purchase and return to the previous page. Click on the Reset button to clear the details entered.
Screenshot:
11.15. Pharmacy Purchase- Purchase Order- Add PO
11.16. Pharmacy Purchase- Purchase Order- Add PO- Added products
11.17. Pharmacy Purchase- PO creation list screen
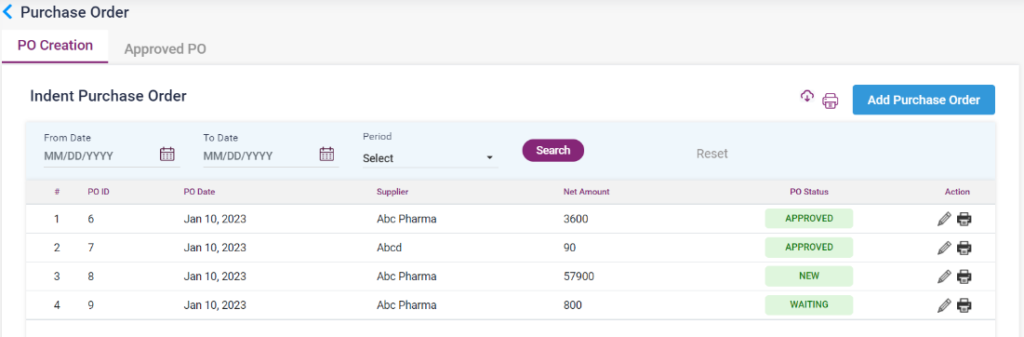
ii) PO Approval:
- The PO was sent for approval, and the approved PO will be displayed on this page.
- Click the edit icon of the PO, which is waiting for approval. In the Edit PO screen, click the “Update” button to approve the purchase order.
- After approval, the “PO Status” of the purchase order will be changed to “Approved”.
- After the PO is approved, the “Go To Purchase” icon will be enabled.
- Clicking the “Go To Purchase” icon directs to the Add Purchase page.
- Medicine Type: There are two options available on this page. When selecting “Load Supplier Specific PO items, ” the items added in the Purchase Order will only be loaded in the “Product Name” drop-down list.
- On selecting the “Load All Items” option, all the medicine available in the medicine master will be loaded.
- After this selection, the process of add purchase need to be followed.
Screenshot:
11.18. Pharmacy Purchase- Purchase Order- Approved PO list screen

11.19. Pharmacy Purchase- Purchase Order- Approved PO- Go To Issue icon- Add purchase screen